Master Bathroom Reveal

I can't even begin to tell you how excited I am to show you photos from this gorgeous master bath and bedroom! In case you missed the "before" pictures, you can find them here. WHAT A DIFFERENCE, right!? 

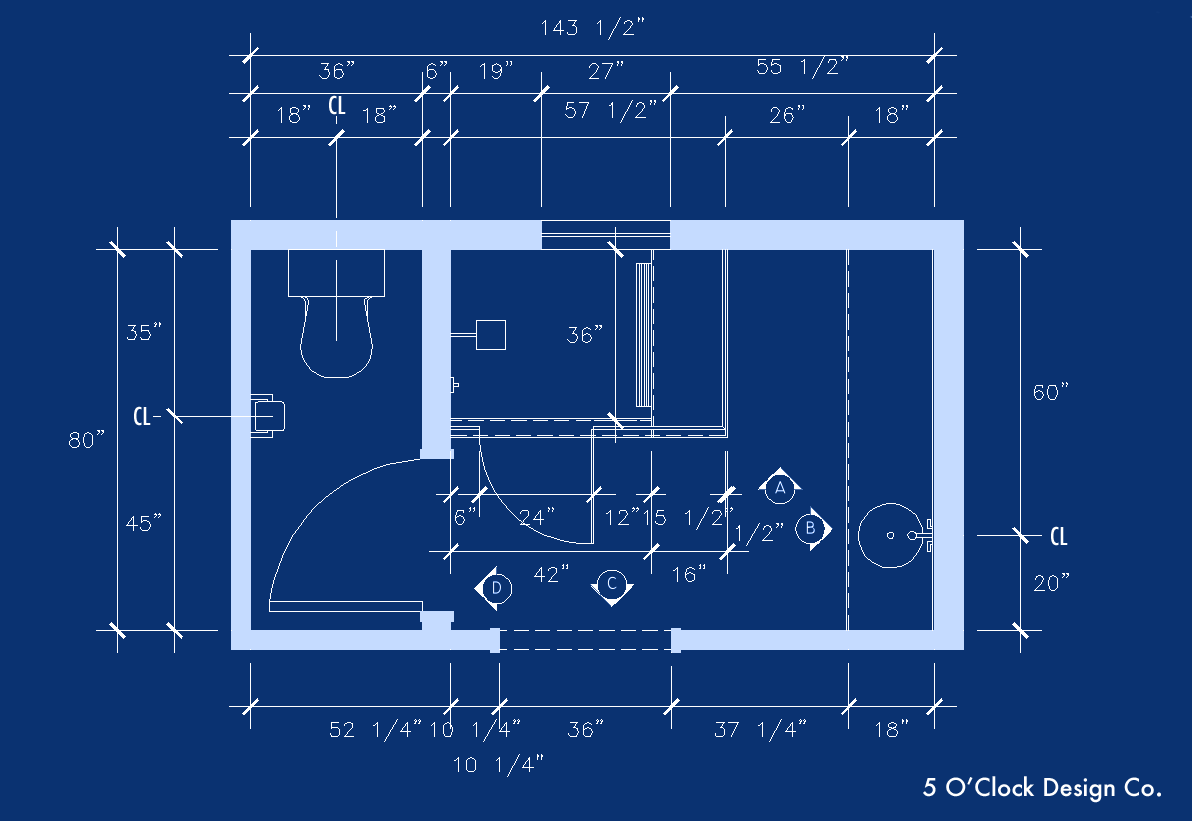
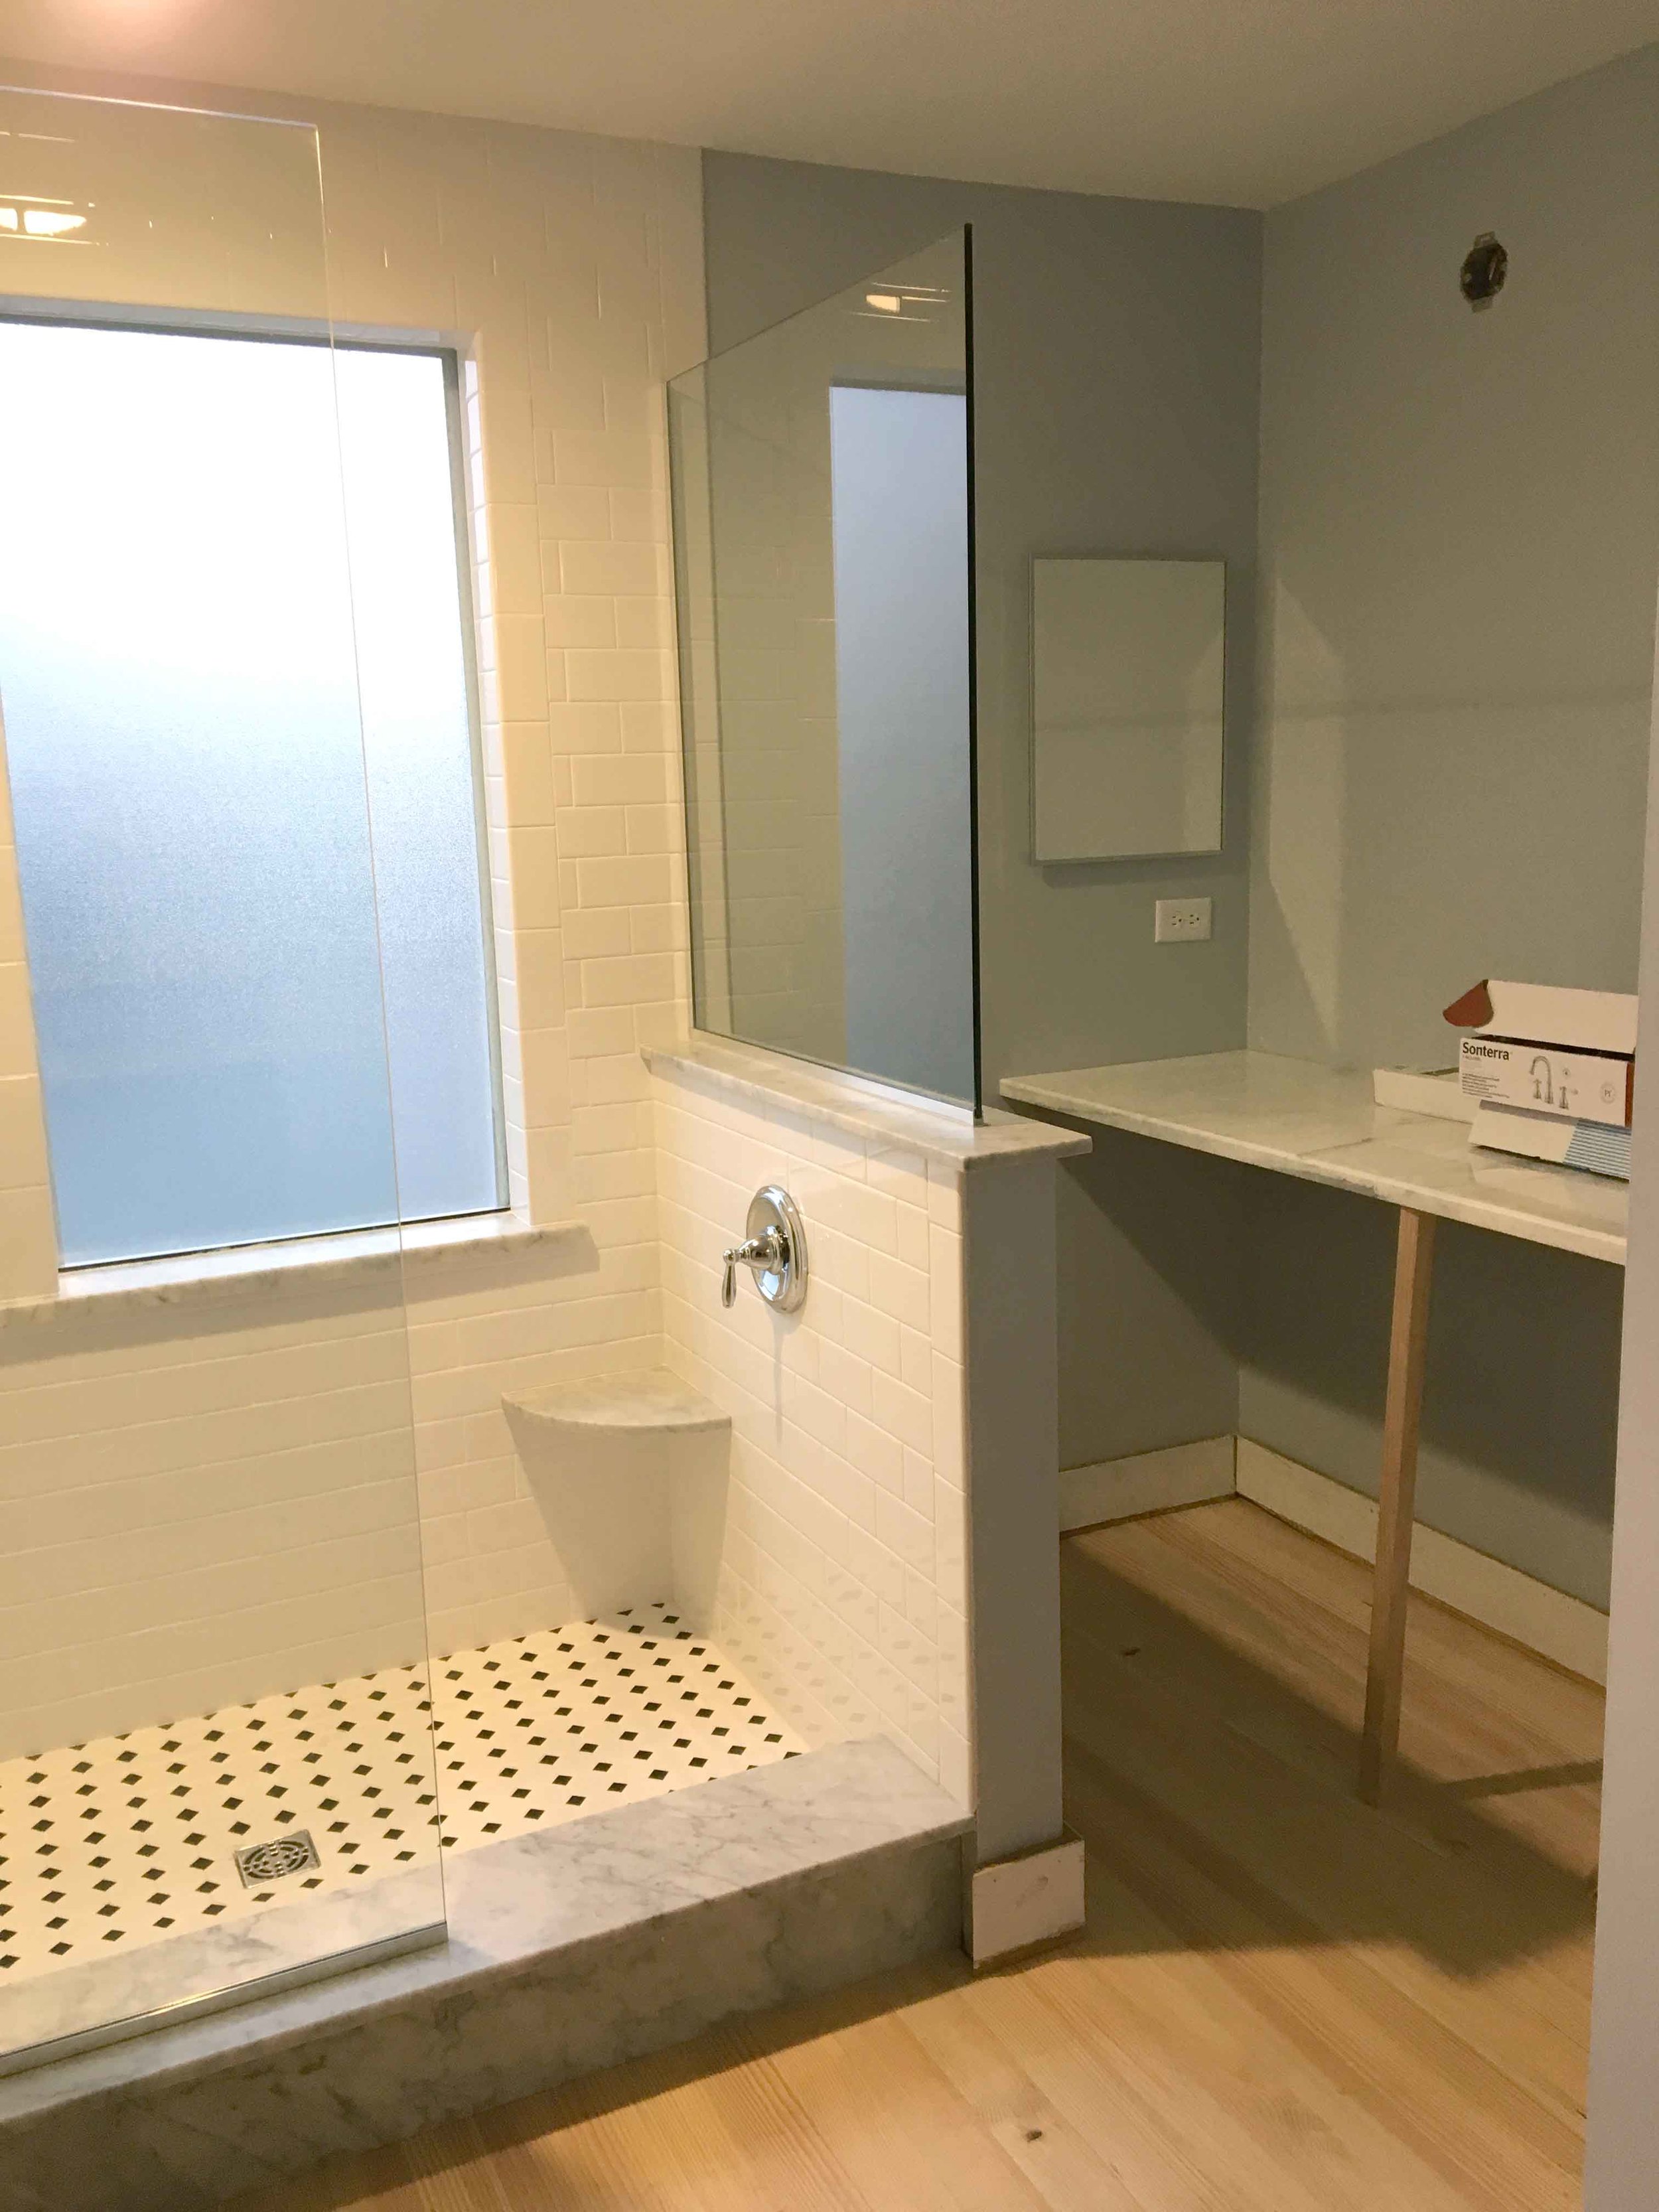
One of my favorite details is all the natural light. Using a glass shower enclosure and half wall take full advantage of the light pouring through the window (don't worry, it's privacy glass!) and then the large mirror over the vanity reflects the light into every corner of the room and overall makes the space appear larger. Orienting the sliding doors in front of the window means that when they are open the sunshine can spill right into the bedroom too.

Speaking of those doors, they are another favorite! The clients indicated that they would really like to use the doors that had been removed in the demolition phase when two bedrooms became one open loft. I'm always a fan of recycling materials so naturally I loved this idea and we made sure to size the new openings accordingly. As an added bonus, these doors are original to the house so they really help to maintain the character and tie in the old and new construction seamlessly. 

Take a look at the finished space below and let us know what you think!

All photos by Rachel Liz Photography

We would love to help you make your space the home of your dreams! Check out our design services and let us know how we can help!

Master Bathroom Build: Part 1

I am nearly bursting at the seams, that's how excited I am to be sharing this project with you! When some dear friends told me that they were going to add a bathroom to their loft bedroom, turning it into a bonafide master suite, I couldn't wait to get started on helping them design a beautiful, functional en suite.

Some of the requirements and priorities of the project included:

  • Separate toilet room
  • Large (ideally walk-in) shower
  • Vanity/makeup counter
  • Maximize natural light from window
  • Bench in shower (this got moved lower in the priority list as the project got underway, with the client opting for more square footage in the shower and a corner ledge instead) 
  • An open feel into the bedroom
  • There was also some plumbing that could not be moved and dictated a fixed point for the toilet

We started with a mood board for the space and a few iterations of floor plan layouts. Interestingly enough, the layout that the clients ultimately selected was not the one they were initially drawn to. I am so grateful they were open to suggestions outside of their comfort zone because the final configuration answers many of their must-haves in an elegant and efficient way.

Here is a BEFORE picture that the client sent at the start of the project. The blue tape line indicates where the wall between the bedroom and bathroom will be. In the final design we ended up stealing about 10 additional inches from the bedroom side. It was hardly noticeable in the bedroom but made a huge difference in the bath.

Master Bath Build Before Picture

The floor plan received a few more tweaks after this, but here is the working concept.

Master Bathroom Floor Plan

3D perspective images helped the clients visualize what the space would look like built out, as well as get a feeling for what the organization and flow would be.

Master Bath Sketchup Model
Master Bathroom Sketchup Model

And finally, pencils down and hammers up! Here are a few pictures of the work in progress.

Master Bathroom // In Progress
Master Bathroom // White Subway Tile
Master Bathroom // Walk-In Shower // White Subway TIle

Want to see how it all came together? Check out the after pictures here!

Kitchen Renovation

 I can't believe that I am sitting here writing this post with my windows open, my bare feet, and in a short sleeve shirt. I know to some of you this may not seem like a big deal, but it is NOVEMBER! and in Central New York, anything over 45 degrees this late in the year is like being on vacation! Seriously, I might go pull out my bathing suit and work on my tan. (joking!)

Ok, so all kidding aside, I am so excited to start this next project. It's going to be a biggie, but I'm diving in head first--I'm finally going to tackle my kitchen! It's the one room in the house I haven't really done a lot with since moving in. It's not that it's awful, it's just not me. But that is about to change! 

I thought I would start by showing you some before pictures and then share some images I've pulled for inspiration. I would classify this as a medium-sized renovation. Here's what I plan on updating:

  • Painting the walls
  • Painting the cabinets (I'm thinking dark on the lowers and light on the uppers)
  • Hardware for the cabinets
  • Light Fixtures
  • White subway tile backsplash with dark grout
  • Fixing a broken cupboard and creating a microwave shelf
  • Under cabinet lighting
  • Possibly some open shelving in place of the hanging pots and pans rack
  • Window treatment

Since it's so much harder to be objective about your own space, I would love to hear your ideas and feedback! Comment below and tell me what you think!

Kitchen Renovation Before Pic
Kitchen Renovation Paint Swatches

I taped the paint swatches of colors I'm considering to wall so I could get a feel for how the colors looked throughout the day in different lighting. It is amazing how much different they look in natural and artificial light! Some of them turn so blue in the evening! Right now I'm leaning toward the third from the top. It is the lightest and I like the color best at night.

Kitchen Renovation Before Pic

This is the broken cupboard (well, drawer actually) that I mentiond. I'm thinking about removing the drawer and its hardware entirely, the cupboard door beneath it, as well as the brace that separates the two. This will leave a big open space where I can build a shelf for the microwave so that I can reclaim the counter space for something prettier. 

I'm also debating taking down the pots and pans rack and putting up some open shelving. We'll see though, the man of the house is pretty attached to it. ;)

`

`

Here the tin backsplash behind the stove is coming down and the new white subway tile will fill that space. I may also try to add some crown molding. The people who lived here before us boxed in the space between the top of the cupboards and the ceiling, but I think some trim would really give it a more finished look.

Kitchen Renovation Before Pic

The counters are a black granite tile with black grout. Not my fave, but not really in the budget to replace them either. Typically I would coordinate vertical and horizontal surfaces in darks and lights, but I am so tired of keeping these (poorly painted) white cabinets clean! That's why I'm thinking black on the lower cupboards, but a fresh coat of white on the uppers. I'm afraid it would become really dark and heavy with all black or I would just do that. To tie in the transition, I'm contemplating dark grout with the white subway tile.

I would love to hear your opinion or words of wisdom if you've learned by experience! Please use the comment feature below to share your thoughts!

And now, a few pictures I've collected as inspiration. Most of these kitchens go above and beyond the scope of this project, but hey, who doesn't love looking at pictures of pretty kitchens!?